


From chewy Japanese mochi to soft rice pudding and Thai mango sticky rice, this guide presents globally loved rice desserts with distinct preparation styles.
Rice is one of the few foods found in every culture. It grows in Asia, Europe, and Latin America, and each culture has come up with its own way to make it into a sweet dish. Rice is a culturally important grain that few other grains are. It absorbs flavor, changes texture when heated, and is used in a wide range of dishes, from creamy, slow-cooked puddings in India and Spain to chewy, filled sweets in Japan.
The desserts in this guide are traditional recipes that have been part of their respective food cultures for a long time. Each recipe is based on the real ingredients and methods used in the country of origin, but it has been adjusted for home kitchen use. This guide gives you the basic information you need to make each dish correctly, whether you want to make something you know or try something completely new.
Why Rice Is a Global Dessert Staple
Two things make rice good for making desserts: its starch content and its lack of flavor. When rice is cooked slowly in liquid, its starch turns into a gel, thickening the liquid around it and creating a creamy, smooth base. This is how kheer, arroz con leche, and riso al latte are made. When glutinous rice is ground into flour and cooked, its starch structure makes it chewy and stretchy, which gives Japanese mochi its texture. Wheat-based doughs can't do this. Because rice has no flavor of its own, it completely absorbs the flavors of other foods. For example, cardamom, cinnamon, saffron, coconut milk, and vanilla all taste great in a rice base without being overpowered by the rice's own flavor.
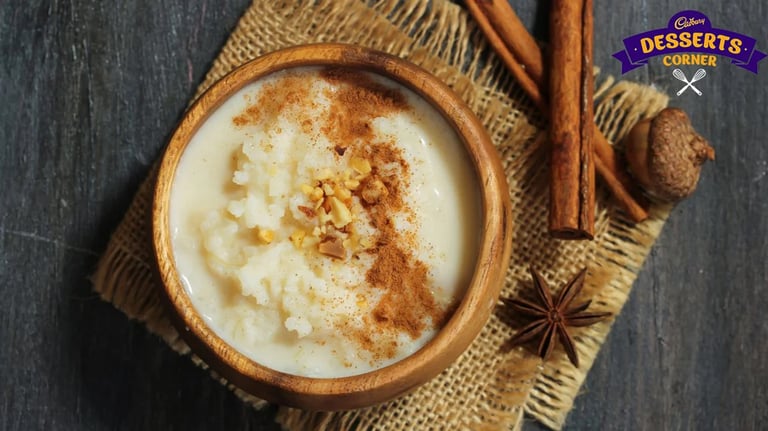
Indian Kheer – The Classic Comfort Rice Dessert
Key Ingredients & Flavor Combinations
- 50 grams / ¼ cup basmati rice
- 1 litre / 4 cups full-fat whole milk
- 100 grams / ½ cup caster sugar
- ½ teaspoon ground cardamom
- A generous pinch of saffron strands soaked in 2 tablespoons warm milk
- 30 grams / 3 tablespoons blanched almonds, roughly chopped
- 20 grams / 2 tablespoons unsalted pistachios, sliced
- 20 grams / 2 tablespoons golden raisins
Flavor Combinations Table
| Base | Spice | Sweetener | Garnish |
|---|---|---|---|
| Full-fat milk | Cardamom, saffron | Caster sugar | Almonds, pistachios, raisins |
How to Make
Step 1 — Wash the Rice
Rinse the basmati rice twice in cold running water, rubbing the grains between your fingers each time, until the water is clear. Drain well and let it sit for five minutes before adding it to the cooking pot. This gets rid of extra surface starch that would make the kheer sticky instead of creamy.
Step 2 — Begin the Milk Reduction
Put the washed rice and the whole milk in a heavy-bottomed saucepan and heat it over low heat without a lid. To keep the milk solids from settling and burning at the bottom of the pan, stir every three to four minutes.
Step 3 — Cook Until Rice Is Soft
Stir the rice every so often and keep cooking on low heat for 35 to 40 minutes, or until the rice grains are completely soft and the milk has reduced by about a third. Before adding the sugar, the mixture should be thick enough to cover the back of a spoon.
Step 4 — Add Sugar and Flavorings
Add the caster sugar and stir until it is completely dissolved. Then add the ground cardamom and saffron-soaked milk. After five more minutes of simmering, stir constantly, and then take it off the heat.
Step 5 — Finish and Serve
Add half of the chopped almonds and raisins; mix well and pour into serving bowls. Then sprinkle the remaining pistachios and almonds on top. You can serve it warm right away or put it in the fridge for two to three hours to cool and set.
Tips & Tricks
Use Full-Fat Milk Only
You can only use full-fat whole milk for kheer. Reduced-fat or skimmed milk won't work because the fat is needed to make it thick. Slow cooking reduces the amount of full-fat milk, which concentrates both the fat and the milk solids. This gives kheer its characteristic richness. Low-fat milk turns into a thin, watery mess that can't be fixed by cooking it more.
Soak Saffron Before Adding
Soaking the saffron strands in two tablespoons of warm milk for ten minutes before adding them to the pot makes the color more even and the smell stronger than adding dry strands directly to the simmering milk. The warm liquid pulls out the color compounds from the saffron better than just the cooking milk, giving the finished kheer a consistent golden-yellow color.
Serve at the Correct Temperature
When you serve kheer warm right after cooking, it has a smooth, pourable texture and a strong, fresh saffron aroma. After being in the fridge for two to three hours, the same preparation has a denser, more set texture, and the rice grains are easier to see against the thickened milk. Both temperatures are traditional and give you different but equally good eating experiences.
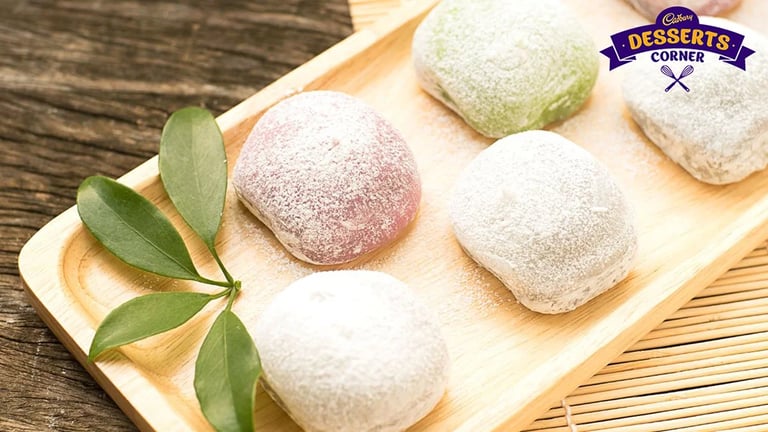
Japanese Mochi – Chewy Rice Delight
Key Ingredients & Flavor Combinations
- 200 grams / 1½ cups glutinous rice flour
- 150 ml / ⅔ cup water
- 100 grams / ½ cup caster sugar
- 50 grams / 5 tablespoons cornstarch for dusting
- 200 grams / ¾ cup sweetened red bean paste or fresh strawberries as filling
Flavor Combinations Table
| Base | Texture Agent | Sweetener | Filling Options |
|---|---|---|---|
| Glutinous rice flour | Cornstarch | Caster sugar | Red bean paste, fresh fruit, matcha cream |
How to Make
Step 1 — Mix the Dough
Put the glutinous rice flour, caster sugar, and water in a microwave-safe bowl. Stir until there are no dry flour bits left and the mixture is completely smooth. At this point, a lumpy batter will result in unevenly textured cooked dough.
Step 2 — Microwave the Dough
Put it in the microwave on high for 60 seconds. Take it out and stir it well, then put it back in for another 30 to 60 seconds, or until the dough is clear, sticky, and pulls away from the bowl walls.
Step 3 — Dust the Work Surface
Before turning out the hot dough, dust a clean work surface well with cornstarch. The dough sticks to any surface it touches when it's warm, so you need to keep a layer of starch on top of the dough and your hands while shaping it.
Step 4 — Divide and Flatten
With a bench scraper or sharp knife, cut the dough into pieces that are all about 30 grams each. Using your fingertips, quickly flatten each piece into a round disc about eight centimeters wide before the dough cools.
Step 5 — Fill and Seal
Put the filling in the middle of each disc, then bring the edges up to cover it completely and pinch the top tightly to seal it. Put each piece that is done seam-side down on parchment paper, then refrigerate it for 30 minutes before serving.
Tips & Tricks
Work Immediately After Cooking
As Japanese mochi dough cools and hardens, it becomes harder to shape. This means that all the filling portions must be measured and ready before the dough comes out of the microwave, so shaping can continue without breaks. When you stretch cold mochi dough, it cracks, and you can't be sure that it will stay closed around the filling. Working in a warm kitchen gives you a little more time to work.
Use Cornstarch Generously
Flour won't keep mochi dough from sticking together at the temperatures where mochi is worked, so cornstarch is the only reliable anti-sticking agent. Put it on all the surfaces, the dough pieces, and your hands between each piece. If there isn't enough starch, you can't shape the pieces, and they stick together on the resting tray.
Chill Before Serving
Putting finished mochi in the fridge for 30 minutes before serving makes it a little firmer and easier to chew than room-temperature mochi, which can be too soft and sticky on the tongue. Cold mochi also keeps its sealed shape better, which lowers the chance that the filling will move toward the seam while being served.
Spanish Arroz con Leche – Creamy Cinnamon Rice Pudding
Key Ingredients & Flavor Combinations
- 150 grams / ¾ cup short-grain rice
- 1 litre / 4 cups full-fat whole milk
- 100 grams / ½ cup caster sugar
- 1 cinnamon stick
- Zest of 1 lemon, cut in strips
- ½ teaspoon vanilla extract
- ¼ teaspoon ground nutmeg
- Ground cinnamon for dusting
Flavor Combinations Table
| Base | Aromatics | Sweetener | Finish |
|---|---|---|---|
| Full-fat milk | Cinnamon stick, lemon zest, nutmeg | Caster sugar | Vanilla, cinnamon dust |
How to Make
Step 1 — Rinse the Rice
Rinse the short-grain rice under cold water until the water is clear, and then let it drain. This removes the surface starch that would make the pudding sticky instead of creamy as it cooks for a long time.
Step 2 — Combine Rice and Milk
Put the rinsed rice in a heavy-bottomed pot with the full-fat milk, cinnamon stick, and strips of lemon zest. Put it on medium heat and let it simmer gently, then turn the heat down to the lowest setting right away.
Step 3 — Slow Cook with Regular Stirring
For 30 to 35 minutes, cook it on low heat without a lid, stirring every five minutes. As the rice releases its starch into the milk, the mixture gets thicker over time.
Step 4 — Add Sugar and Flavorings
Add the caster sugar, vanilla extract, and nutmeg after the rice is soft and the mixture coats the back of a spoon. Remove the cinnamon stick and lemon zest strips after two minutes of stirring until the sugar is completely dissolved.
Step 5 — Serve and Garnish
As soon as the rice pudding is done, pour it into serving bowls. It will thicken more as it cools, so it's easier to serve while it's still liquid. Before serving warm, sprinkle a lot of ground cinnamon on top. If you want a cold preparation, chill it for two hours.
Tips & Tricks
Use Short-Grain Rice Only
Short-grain rice releases much more starch during cooking than long-grain rice does. This is how arroz con leche gets its thick, creamy texture. Long-grain rice stays separate and distinct in the milk rather than breaking down and making it thicker. No matter how long you cook it, using a different long-grain variety will not change the result.
Never Rush the Cooking Process
A quick boil breaks down the proteins in the milk, making it grainy and curdled instead of smooth and creamy. The whole time you cook, you need to keep the heat as low as possible, at a gentle simmer where only a few bubbles break the surface. You can't cut down on the 30 to 35 minutes of cooking time by turning up the heat, because that would ruin the texture for good.
Balance the Lemon Zest
You have to take the lemon zest strips out before you serve the pudding. If you leave them in, they will make the pudding taste more bitter and acidic as it cools, which will overpower the cinnamon. The strips should soak for the whole cooking time to add their smell, but not a second longer. Cutting the zest into big strips instead of grating it makes it easy to take off.
Thai Mango Sticky Rice – Tropical Rice Dessert
Key Ingredients & Flavor Combinations
- 300 grams / 1½ cups glutinous sticky rice
- 400 ml / 1⅔ cups full-fat coconut milk
- 80 grams / 4 tablespoons caster sugar
- ½ teaspoon salt
- 2 large ripe Alphonso or Nam Dok Mai mangoes, peeled and sliced
- 1 teaspoon toasted white sesame seeds
Flavor Combinations Table
| Base | Fat | Sweetener | Seasoning | Garnish |
|---|---|---|---|---|
| Glutinous sticky rice | Coconut milk | Caster sugar | Salt | Ripe mango, sesame seeds |
How to Make
Step 1 — Soak the Rice
Put the glutinous rice in cold water and let it soak for at least four hours or overnight. If you don't soak glutinous rice, it will cook unevenly, with hard, chalky centers even after long steaming.
Step 2 — Steam Until Cooked
After soaking the rice, drain it and put it in a bamboo or metal steamer lined with cheesecloth. Steam it over boiling water for 20 to 25 minutes, or until each grain is cooked through and the texture is sticky and cohesive throughout.
Step 3 — Prepare the Coconut Sauce
In a small saucepan over low heat, mix 300 ml of the coconut milk with the caster sugar and salt. Keep stirring until the sugar and salt are completely dissolved. Don't let the mixture boil.
Step 4 — Soak the Rice in Coconut Milk
Put the hot steamed rice in a bowl, pour the warm coconut sauce over it, and fold it in gently. Before serving, let the rice soak up the coconut mixture for at least 15 minutes. If you don't give it enough time to soak up the mixture, the rice will be dry in the middle but look well-coated on the outside.
Step 5 — Plate and Serve
Put the coconut-soaked rice next to the sliced ripe mango on a flat plate. Pour the last 100 ml of coconut milk over the rice and mango, then right before serving, sprinkle the toasted sesame seeds on top.
Tips & Tricks
Serve at Room Temperature
It's best to serve Thai mango sticky rice at room temperature instead of hot or cold. Hot sticky rice has a gummy, starchy mouthfeel that gets much better after it cools down a bit and the coconut milk has spread through the grain. When sticky rice is put in the fridge, it gets hard and loses the soft, yielding texture that makes it so special.
Do Not Skip the Salt
You can't leave out the salt in the coconut sauce. It gives the dish its unique sweet-savory balance, setting real mango sticky rice apart from a version that just tastes like sweet coconut. The salt makes the mango's natural acidity stand out more in the combined bite, balancing the sweetness.
Use Firm, Ripe Mangoes
Too ripe mangoes let out too much juice, which makes the plate wet and thins out the coconut milk drizzle. A mango that is ripe but still holds its shape when cut—meaning it gives way to pressure without getting mushy—makes clean, whole slices that look good next to rice and soak up the last coconut drizzle without falling apart.
Italian Rice Pudding – Riso al Latte
Key Ingredients & Flavor Combinations
- 200 grams / 1 cup Arborio rice
- 1 litre / 4 cups full-fat whole milk
- 80 grams / 6 tablespoons caster sugar
- 1 teaspoon vanilla extract
- Zest of ½ lemon
- ¼ teaspoon ground cinnamon
Flavor Combinations Table
| Base | Grain | Sweetener | Aromatics |
|---|---|---|---|
| Full-fat milk | Arborio rice | Caster sugar | Vanilla, lemon zest, cinnamon |
How to Make
Step 1 — Combine Rice and Milk
Put the Arborio rice and whole milk in a heavy-bottomed pot and turn the heat to low. At this point, add the finely grated lemon zest. It will steep throughout cooking and spread evenly throughout the finished pudding.
Step 2 — Begin Slow Cooking
Put it on low heat and stir right away to keep the rice from settling at the bottom of the pan while the milk heats up. Keep the heat as low as it can go while you cook.
Step 3 — Cook for 25 to 30 Minutes
Cook the rice for 25 to 30 minutes, stirring it often, until it is completely soft and the mixture has thickened to a creamy, porridge-like consistency that doesn't flow freely from a spoon.
Step 4 — Add Sugar and Spice
Put in the ground cinnamon, vanilla extract, and caster sugar. For two minutes, keep stirring until the sugar is completely dissolved and the spices are evenly spread out in the mixture.
Step 5 — Serve Warm or Chilled
Remove from the heat and serve immediately in separate bowls for a warm, liquid dish. For a set, cold version, pour into bowls, cover with plastic wrap pressed against the surface, and refrigerate for two hours.
Tips & Tricks
Use Arborio Rice
The high starch content of Arborio rice, which is what makes it great for risotto, slowly releases during the slow cooking of the milk. This makes the milk thick and creamy without adding any thickening agents. Regular long-grain rice doesn't release enough starch to achieve this texture. No alternative yields a similar outcome for riso al latte.
Stir Continuously in the Final Ten Minutes
The mixture is much more likely to stick to the base during the last stage of cooking, when it has thickened enough to lower the insulating liquid layer between the rice and the pan base. If you stir less often at this point, the milk solids will burn and leave dark flecks and a slightly burnt taste in the finished pudding.
Do Not Increase the Heat
When milk boils too quickly, the proteins break down, and the result is a thin, grainy texture that can't be fixed by any other means. The whole 25 to 30 minutes of cooking must be done over low heat. This is not up for debate, and being patient during this time is the most important thing you can do to make sure the pudding turns out well.
Key Ingredients Used in Rice Desserts Worldwide
- Glutinous rice flour — mochi; elastic, chewy texture
- Short-grain or Arborio rice — arroz con leche, riso al latte; starch-rich, creamy puddings
- Full-fat coconut milk — Thai sticky rice; richness without dairy
- Whole full-fat milk — kheer, Spanish, Italian puddings; essential for creamy reduction
- Caster sugar — universal sweetener
- Cardamom, saffron — Indian aromatics
- Cinnamon stick, lemon zest — Spanish and Italian aromatics
- Ripe mango — Thai preparation garnish
Tips & Tricks for Perfect Rice-Based Desserts
Choose the Correct Rice Variety
Use glutinous rice or glutinous rice flour for chewy, sticky dishes, short-grain rice for creamy puddings, and basmati rice for kheer, where the grains keep their own shape. No matter what technique you use, the wrong type will always result in the wrong texture. There is no way to fix a structural mismatch between the rice type and the cooking method by changing the way you cook it.
Always Cook Slowly
For creamy rice pudding, you have to cook it slowly over low heat. This is true for kheer, arroz con leche, and riso al latte as well. When milk proteins denature quickly, the cream becomes grainy and separated rather than smooth and cohesive, as it does when starch is released slowly during cooking. The most important thing in this category is to keep the heat setting as low as possible throughout the cooking time.
Add Sweetness After the Rice Is Cooked
When you add sugar to cold milk at the start of cooking, it stops the milk from thickening and makes the base thinner. Adding a sweetener after the rice is fully cooked lets the starch gelatinization happen without any competition, which makes the result thicker and more consistent. This rule for putting things in order applies to all of the rice pudding recipes in this guide.
Creative Variations to Try
Adding 30 grams of grated dark chocolate to a hot riso al latte makes a rich, evenly flavored pudding. Coconut caramel kheer uses full-fat coconut milk instead of half of the milk and adds two tablespoons of jaggery along with the regular sugar. Fusion mango sticky rice bowls are made in the same way as regular Thai sticky rice bowls, but they are topped with a drizzle of dark chocolate sauce.
Serving Ideas for Global Rice Desserts
Before the first spoonful, clear glass bowls show off the texture and garnish of kheer and riso al latte. A flat plate with rice piled up on one side and mango sliced next to it is the best way to serve Thai mango sticky rice. A global rice dessert tasting platter, which is a single board with small portions of all five preparations, is a great way to serve food at a dinner party where people are encouraged to try new things.
Frequently Asked Questions
What are the most popular rice desserts in the world? 
Kheer from India, mochi from Japan, arroz con leche from Spain, Thai mango sticky rice, and Italian riso al latte are the most famous desserts in the world. Each one uses rice in a different way, such as as a pudding base, as flour, or as a whole steamed grain. This gives each one a different texture and flavor.
Can rice be used in desserts?
Yes, when slow-cooked in milk, rice becomes a creamy pudding base. When processed into glutinous flour, it becomes a chewy dough. When steamed whole, it becomes a sticky grain that absorbs sauce. Different culinary traditions use different methods of preparation, making each dish taste very different.
Why is rice used in desserts instead of flour?
Rice has a unique type of starch that slowly gelatinizes in liquid, making it creamy in a way that puddings thickened with flour can't. Glutinous rice flour produces a texture that is elastic and chewy, which wheat flour can't. Rice also absorbs flavors around it, making it a good way to carry cardamom, cinnamon, and coconut milk.
Like This Article?
More Like This


Popular Articles


Trending Web Stories


Curated Recipes


