


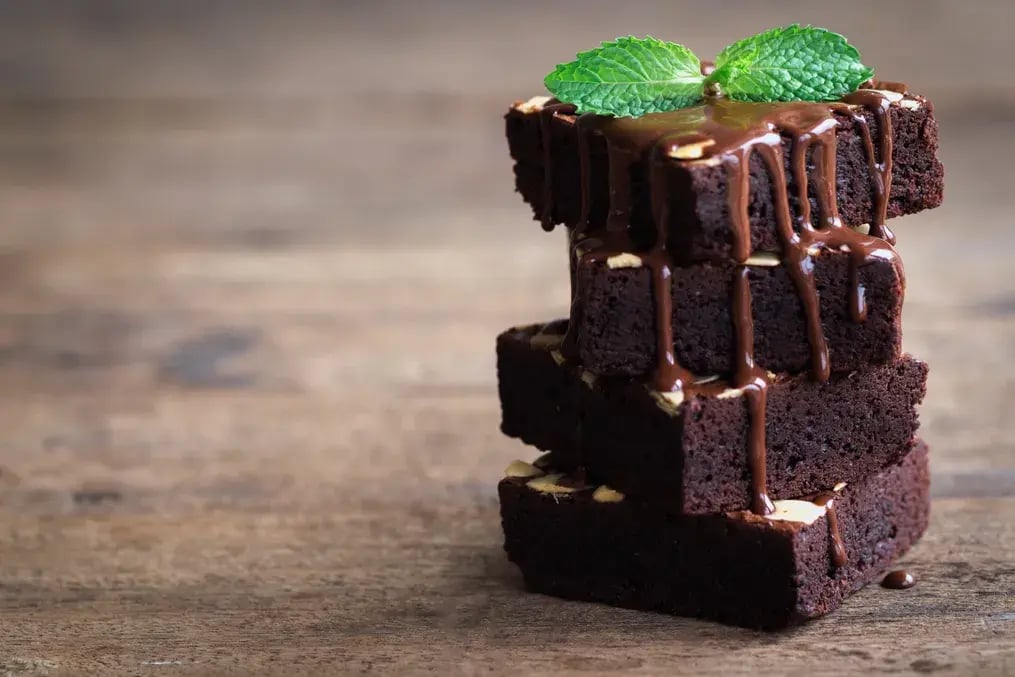
Rich gluten‑free fudgy chocolate brownies with that shiny crust—simple to bake, hard to resist. Want to make? Read how to make them

Isn't it wonderful the way one little square of brownie is enough to transform a dull night into one of happiness? For those gluten-free or cooking for someone, fudgy chocolate brownies can often feel like a thing of the past. And World Chocolate Day, 7 July, is the ideal opportunity to make something really treat-like.
A brownie that's dense, moist and shiny, but completely wheat‑free—is achievable. It begins with straightforward substitutions and minimal kitchen smarts. Milky crumbs, cracked crust and rigid outcomes are all typical pitfalls. But with the correct type of flour, technique and timing, you can get that perfect gooey center and crunchy top that brownies are renowned for.
Ready to revolutionise the gluten-free world? This is your time. Fancy creating fudgy chocolate brownies that wow every taste bud? Do it this way—read how to do it and learn these secrets.
Gluten‑Free Fudgy Chocolate Brownies Recipe
Ingredients:
- 200g dark chocolate (70% cocoa, dairy‑free acceptable)
- 150g unsalted butter or dairy‑free alternative
- 150g granulated sugar
- 3 large eggs, room temperature
- 1 tsp vanilla extract
- ¾ cup gluten‑free all‑purpose flour blend with xanthan gum
- 2 tbsp unsweetened cocoa powder
- Pinch of salt
Method:
- Preheat oven to 180°C. Line 8×8‑inch square tin with parchment.
- Melt butter and chocolate in a heatproof bowl over gently simmering water, stirring until smooth.
- Remove from heat and whisk in sugar until the surface is glossy.
- Beat eggs individually, beating in each until it's absorbed and you notice a shine.
- Add vanilla. Sift gluten‑free flour, cocoa powder and salt over the bowl, then fold lightly just until mixed.
- Don't overmix.
- Pour batter into the tin and tap gently to dislodge air pockets and bake 20–25 minutes.
- The top should be cracked and shiny, and a toothpick will leave moist crumbs.
- Let cool to room temperature before cutting into neat squares.
Select the Right Gluten‑Free Flour Blend
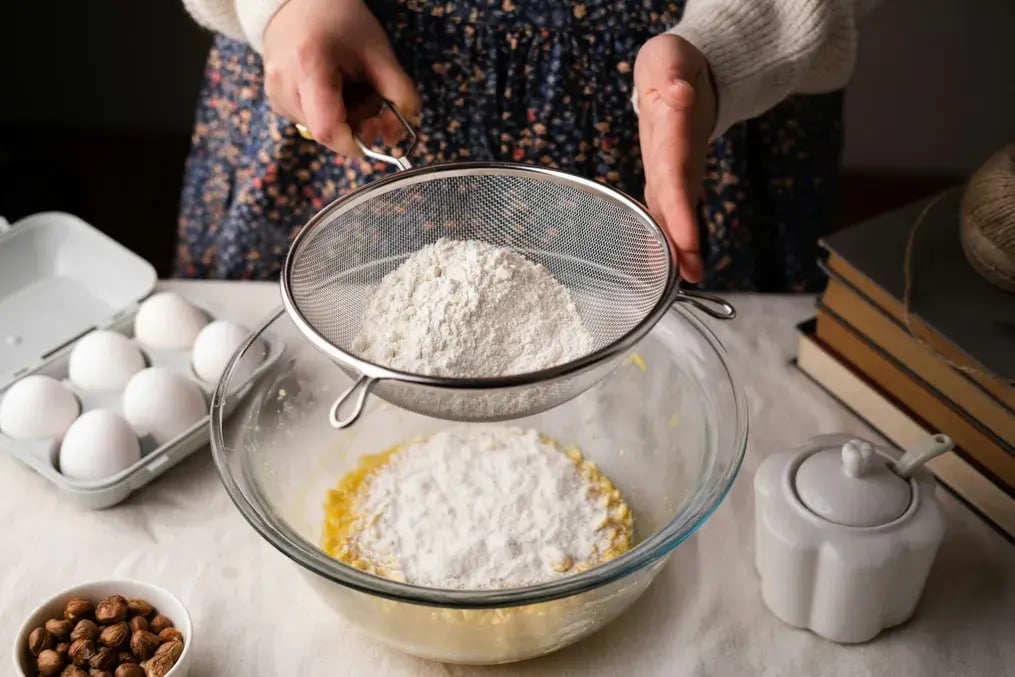
Not all gluten‑free flours are suitable for fudgy chocolate brownies. Employ a baking blend containing xanthan gum—it holds ingredients together and replicates wheat elasticity. Unflavored rice flour or single flours such as almond or sorghum will result in crumbly textures. See the package instructions: some blends require added moisture or fat. Measure carefully—gluten-free flours draw moisture from the batter differently. A touch of more moisture prevents your chocolate brownies from drying out. Substitute in your flour mix, mix thoroughly and the payoff is fudgy, dense slices that won't fall apart.
Melt Butter and Chocolate Slowly

Melt chocolate and butter slowly—either over a double boiler or in brief microwave blips—to prevent scorching. Scorching pieces will spoil the shiny crust and dull the flavor. Stir constantly as it begins to melt. When completely smooth, take straight out of heat immediately. The heat melts the sugar and allows the eggs to mix in smoothly. Don't overheat, or you'll end up with a grainy batter. Shiny melting provides your brownies with that characteristic sheen and gooey center. When your mixture is smooth and velvety, proceed directly to the next step to maintain that richness.
Whisk Sugar into Warm Chocolate for Shiny Crust
Once melted, whip in sugar when warm. That dissolves half the sugar crystals and primes for the crunchy, crinkled top. Whisk until the film appears shiny. That shine is evidence the crust will crunch. Skip it and your brownies can end up flat or lackluster. It's a quick action but essential to attaining that shiny finish. Once the sugar is glossy and the batter has thickened slightly, beat‐in eggs and other additions.
Add Eggs Gradually at Room Temperature
Whole eggs contribute to structure development in gluten‑free fudgy chocolate brownies. Room‑temperature eggs mix more smoothly with the chocolate. Add them gradually, whisking thoroughly between additions. This makes sure air is whipped into the batter, allowing the crust to set while leaving the center dense and shiny. Haste or cold eggs can cause separation or lumps. Silky batter through gentle whisking is important—each egg contributes moisture and shine. Your work here dictates how well your brownies set and rise.
Fold Flour Gently, Don't Overmix
Gluten-free flours are more sensitive—overmixing causes dryness or chewy bites. Fold very gently after sifting cocoa and flour until streaks have vanished. Don't overdo it. Overmixing ruins the crumb and prevents that fudgy center from developing. A speck or two of flour is preferable to over-worked batter. Gentle folding quickly maintains the humidity and integrity of the batter, and saves your brownie center from being too fluffy. With gentle mixing, each piece will bake evenly and provide that lovely mouthful.
Bake for Glossy Crust and Moist Centre
The ideal bake is 180°C for 20–25 minutes. That provides a glossy top and fudgy center. Begin checking for 20 minutes—when the top starts to crack a little, and a toothpick has moist crumbs, it's done. If wet-looking, check in a minute or two again, but do not allow it to dry. After baking, allow the brownies to remain in the tin for around 10 minutes before placing them on a wire rack. Cooling in the tin causes the center to settle, preventing messes when cutting. The shiny shell with rich center effect is created by careful baking time.
Cool Completely and Use Proper Storage
Never cut hot brownies—cooling allows the crust to set and the center to stabilize. After cooling, remove the parchment and refrigerate brownies for an hour before cutting for neat lines. Refrigerate in an airtight container. To preserve the crust, insert layers with parchment and include a paper towel at the bottom to draw out dampness. Serve at room temperature or warmed briefly for that molten sensation. A rested brownie retains its gloss and richness, bite after bite. Adequate cooling and storage seals in that baked magic.
Like This Article?
More Like This


Popular Articles


Trending Web Stories


Curated Recipes


