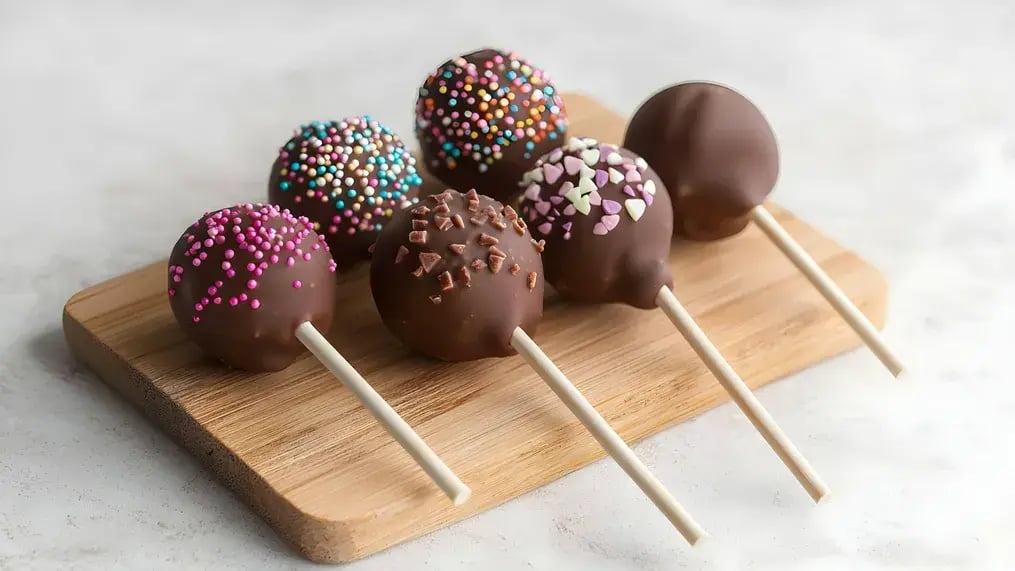
Gather your ingredients and make yourself these delightful chocolate dipped dessert pops for when little sweet cravings arrive. Check out the easy step-by-step recipe and dive into the chocolatey sensation.

Chocolate pops are a wonderful bite sized dessert for any occasion. Stuck on a toothpick and decorated with whimsical toppings, chocolate pops look just as good as they taste. Without much effort, you can prepare chocolate pops with almost any core ingredient you can think of. From fruits to leftover cake, marshmallows, and even cookie dough, chocolate pops can be made with almost anything. All you have to do is just add a stick to the fruit, cake ball, marshmallow, or cookie dough ball, then freeze it to set and coat with melted chocolate. This idea is perfect for when you are throwing a huge party with a large crowd.
This recipe for chocolate dipped pops uses cookie dough as the core. The dough is prepared from scratch by using easy ingredients so you can enjoy a wholesome and satisfying sensation in every bite. Follow the recipe below and make these chocolate dipped dessert pops today.
For the Base:

- 1 cup flour
- ½ cup butter
- ½ cup brown sugar
- 2 tbsp milk
- ½ tsp vanilla extract
- Pinch of salt
- ½ cup mini chocolate chips
For Dipping:
- 2 cups semi-sweet or milk chocolate chips
- 1 tbsp coconut oil or vegetable shortening
Decorations:
- Sprinkles
- Crushed nuts (pistachios, almonds, peanuts)
- Shredded coconut
- Crushed Oreo cookies
- White chocolate for drizzling
- Sea salt flakes
Method:

Step 1: Heat Treat the Flour
This method shows you how to make cake pops using a cookie dough base. For this, first heat treat the flour in the microwave for 1 minute at 350°F (175°C). If using an oven, heat treat for 5 minutes at the same temperature.
Step 2: Make Cookie Dough
Now combine the heat treated flour with butter, brown sugar, milk, vanilla extract, a pinch of salt, and mini chocolate chips. Mix together until a firm and soft dough forms. Roll this dough out into bite sized balls.
Step 3: Insert Sticks and Chill
Now insert lollipop sticks or toothpicks into the prepared balls. Place it on a parchment paper lined tray and freeze for 30 to 60 minutes to make them firm so it can hold the shape better. Cooling also makes the surface cold so when dipped in chocolate, it holds the chocolate and doesn’t let it slip away, making dipping more efficient.
Step 4: Melt Chocolate
While the cookie pops are freezing, prepare the chocolate. Take a microwave safe bowl and add chocolate chips or pieces of chopped chocolate bar into it along with some coconut oil. Melt the chocolate in a preheated microwave for 20-30 seconds in small bursts. Stir the chocolate between each burst until it turns smooth and glossy.
You can also melt chocolate on the stovetop using the double boiler method. For this, heat up some water in a saucepan until it starts to steam and place the bowl of chocolate over the saucepan. The steam rising from water will settle at the bottom of the chocolate bowl and will melt it quickly and evenly. Stir the chocolate until you get a smooth and glossy finish.
Step 5: Dip & Decorate
Now it's time to take out the cookie dough pops and coat it with chocolate. Dip each chilled pop into melted chocolate and coat it evenly. Top it immediately with white chocolate and the decorations. Place it on the parchment paper to set for 30 seconds at room temperature.
Step 6: Chill
After setting at room temperature, speed up the process by chilling the pops in the fridge for 10-15 minutes. Once set, enjoy them right away.
Tips to make chocolate dipped dessert pops perfect:
- Do not skip chilling time as it prevents the chocolate from melting and pops from falling off the stick while you dip. Freezing will make the work much easier for you.
- To bring a festive flair, introduce some food coloring into the while chocolate for bringing a whimsical appeal.
- If you want to make chocolate more glossy, temper it properly or use coating chocolate instead of chocolate chips or chocolate bars.
- Make sure to store the pops in an airtight container if you want to preserve it for later. In this way, you can enjoy the pops for up to 5 days.
- You can make these pops 1 to 2 days in advance if you are planning for a huge party with lots of guests. Just keep them refrigerated until serving.
- Make sure your fridge is dry and not humid as it can affect the texture of chocolate and make it sweat despite freezing.
Like This Article?
More Like This



Popular Articles


Trending Web Stories
Curated Recipes


