


3 mins
Apr 8, 2026
EN
हिं

Oreo Pops Recipe – Easy Chocolate Oreo Pops for Kids (No-Bake) Recipe

Rishita Thalluri
Make fun, no-bake Oreo Pops with simple ingredients for a quick, kid-friendly treat. These chocolate-coated bites are easy to prepare and perfect for parties or snacks.
Difficulty:easy
Serves:8
Time:25 mins
Contains egg: No
Whether you’re looking for a holiday treat to keep the kids happy or just a weekday dessert that they can look forward to after an exhausting round of homework and extra classes, this recipe for Oreo Pops will prove remarkably versatile. There isn’t much to it: in fact, it’s the simplicity that makes it such a big hit with you (such little effort!) and the kids (so much deliciousness!). You will need to account for the time these Pops need to set firmly, so do factor that in ......Read More
Ingredients You’ll Need
to Make Oreo Pops
8
Servings
For the Recipe
- Oreo- 2 packs
- Cadbury Dairy Milk- 2 bars
- Fresh Cream- ¼ cup
- Sprinkles- for decoration
Step-by-Step Oreo Pops Recipe (With Pro Tips)
Step 1: Smash The Oreos

To make Oreo cake pops, put the Oreo cookies in a zip-lock bag that is sealed and use a rolling pin to crush them until they are all the same size, and there are no big pieces left. If you crush the dough unevenly, it will have an uneven texture and break along the fault lines of the bigger biscuit pieces when you shape it into balls. In 15 seconds, a food processor does the same thing and makes the whole batch have a finer, more even crumb.
Step 2: Mix The Dough
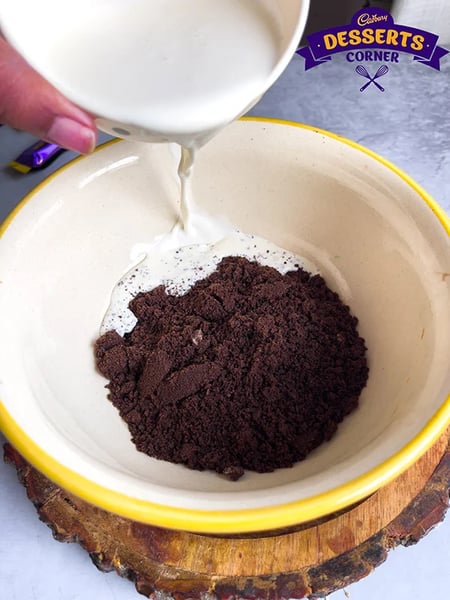
Put the crushed Oreos in a mixing bowl and add the cream cheese one tablespoon at a time, mixing well after each addition before adding the next. When you press the dough between two fingers, it should hold its shape without breaking apart or sticking to your skin. It's hard to tell if the dough is the right consistency when you add all of the cream cheese at once because it gets too soft and hard to shape.
Step 3: Make The Pops
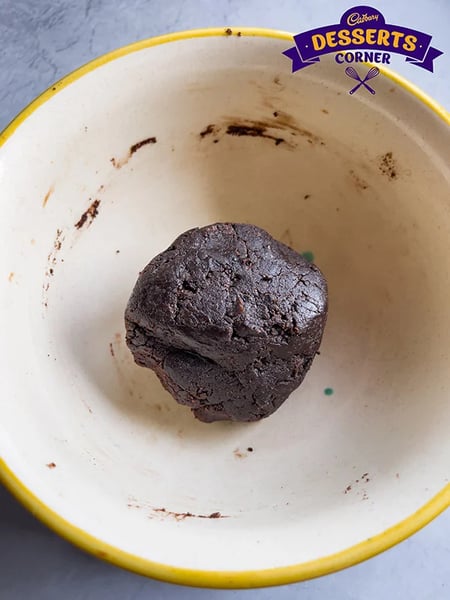
Take about one tablespoon of dough and roll it between your palms until it is a smooth, even ball with no cracks or seams on the surface. Put each finished ball on a tray lined with parchment paper. Use a lollipop stick to push the stick halfway through the center of each ball without breaking the surface. Then, put the tray in the fridge for 30 minutes. Chilling the dough around the stick makes it firm enough to hold the ball while it is dipped and coated without coming loose.
Step 4: Cover With Chocolate
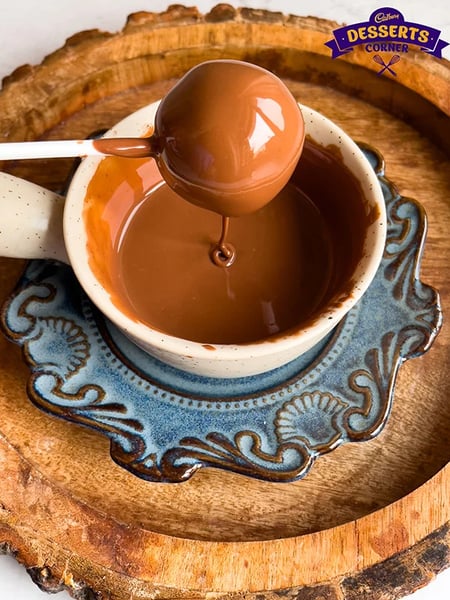
Use a double boiler or microwave on medium power for 30 seconds at a time, stirring between each interval, to melt the chopped chocolate and coconut oil together until the mixture is completely smooth. Before dipping, let the melted chocolate cool to about 32°C. If the chocolate is too hot, it will soften the chilled dough ball when it touches it, which will make it lose its round shape before the coating sets. To set the pops, hold each one by the stick, dip it all the way into the chocolate, lift it out cleanly, let the extra chocolate drip off for three seconds, and then place it on parchment.
Step 5: Decorate And Set
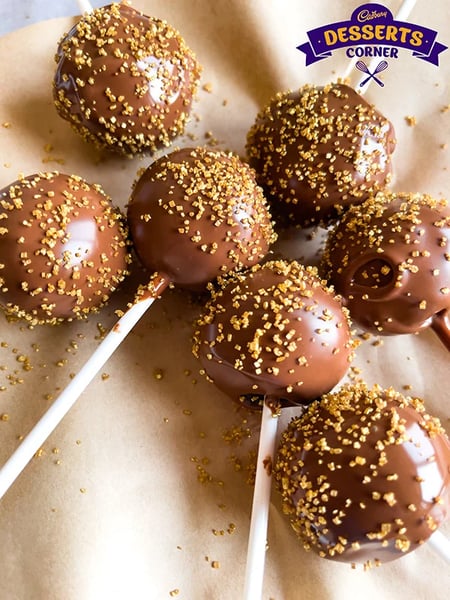
As soon as you dip each pop, while the chocolate is still fully liquid, use a light hand to sprinkle the chosen decoration over the top. At room temperature, the chocolate will harden in 60 to 90 seconds, and no matter how hard you press the toppings, they won't stick. Instead of letting the decorated pops set at room temperature, put them in the fridge for ten minutes before serving or packaging them. This will give them a cleaner, more polished look.
Pro Tips to Make Perfect Oreo Pops Every Time
Prevent cracking
To avoid cracking in Oreo Pop-Tarts, make sure you have enough binding agent in the dough ball and don't chill it too much before dipping. If the dough is too cold, it will become stiff and brittle when it hits the warm chocolate. If the balls get cracks on their surfaces after being in the fridge, let them sit at room temperature for five minutes before dipping. This will make the dough a little softer and more flexible. Adding an extra tablespoon of cream cheese to any batch that crumbles while rolling fixes the problem before it affects the pops.
Proper dough consistency
When the dough is mixed right, it should feel like smooth, firm playdough. It shouldn't be sticky against your palms or so dry that it cracks when you press it flat between your fingers. The best way to check the consistency before shaping the whole batch is to press a small piece against the work surface and see if it holds a clean edge without breaking. If the dough feels dry and crumbly at this point, add cream cheese half a tablespoon at a time until the texture is right.
Chocolate coating tips
To control the chocolate coating in the Oreo cake pop recipe, add one tablespoon of coconut oil to every 150 grams of melted chocolate. This will make a coating that flows evenly over the curved surface of the dough ball and sets into a thin, clean shell without pooling at the base. When chocolate cools down, it doesn't coat evenly; it's thick in some places and thin in others. This is especially true when making a large batch. When you work with chocolate over a bowl of warm water, you can work with it for longer, and the coating will maintain the same dipping viscosity throughout.
Best Chocolate To Use For Oreo Pops
Cadbury Dairy Milk
Cadbury Dairy Milk is the best everyday coating chocolate for Oreo pops because it has a balanced sweetness and always melts smoothly. The milk solids in it make a coating that sets with a slight shine and a clean snap. It goes well with the Oreo biscuit base, and neither part overpowers the other. To get the best results, cut the bar into small, even pieces before melting it. This will make sure that the coating is smooth and free of lumps.
Dark Chocolate (55–70% cocoa)
Dark chocolate (55–70% cocoa) is less sweet than milk chocolate and has a stronger cocoa flavor that balances out the sweetness of the Oreo dough base. It makes a shell that is thinner and snappier than milk chocolate, making it great for adults or anyone who thinks the regular version is too sweet. The higher cocoa butter content in good dark chocolate also makes the coating look a little better when it hardens.
White Chocolate
White chocolate is the sweetest of the three standard choices. It looks great next to the dark Oreo dough ball. It needs a little more careful temperature control while melting because it burns more easily than cocoa-containing kinds. White chocolate is the best choice for themed party decorations because it can be colored with oil-based food coloring.
Compound chocolate
Compound chocolate is the best choice for beginners because it melts easily at low temperatures, doesn't need to be tempered to set with a clean finish, and comes in a variety of flavors besides cocoa. It doesn't have the same depth of flavor as couverture or high-quality bar chocolate, but it's a good choice for big batches because it's easy to use and always works. Once it sets, it is also more stable in heat, which makes it a better choice for Oreo cake pops that will be moved or shown at room temperature.
Ruby chocolate
Ruby chocolate is a newer type of chocolate that gets its naturally fruity and slightly tart flavor from ruby cocoa beans instead of added flavoring. This is an interesting contrast to the classic Oreo base. Its unique pink color doesn't need any artificial coloring, so it looks and feels different from regular chocolate options. It costs more and is harder to find than other types, but it's worth it for special occasions.
Creative Ways To Decorate Oreo Pops
Birthday Theme
Pastel-colored sprinkles on a white chocolate coating, along with edible gold pearl dust and small number-shaped sugar pieces pressed into the wet surface, make it look like the cake was made with a specific theme, even though you don't need any special decorating skills to do it. By matching the colors of the sprinkles to the party's color scheme, the pops look like they belong with the rest of the decorations. Putting each finished pop in a small clear bag and tying it with a ribbon of the same color is the final touch.
Festive Theme
Christmas with red sprinkles on a dark chocolate coating, Halloween with orange or black sprinkles, and Valentine's Day with red sprinkles. You can change the color and decoration of the coating to fit any occasion. If you plan the decorations ahead of time, all the toppings will be ready and easy to get to before the chocolate hardens. Silicone molds in the shape of hearts, stars, or round flats instead of regular spheres give the dough balls a more seasonal look.
Double Drizzle
Dip the pop in dark chocolate as the base coat and let it set for 90 seconds. Then, use a fork or piping bag to drizzle melted white chocolate over the top in thin, even lines. This makes a two-tone effect that looks professional and doesn't need any special tools. The same method works in the opposite direction: a base of white chocolate with a drizzle of dark chocolate. Changing the thickness and angle of the drizzle lines across a batch makes it look like they were meant to be different instead of the same.
Crushed Topping
Rolling the freshly dipped, still-wet pop in a shallow plate of finely crushed Oreo crumbs gives it a textured, matte finish that directly refers to the biscuit base inside. This method works best when the coating chocolate is white or a light color, because the dark Oreo crumb makes the most contrast. The crumb layer also gives the outside of the finished pop a second crunch that the smooth chocolate coating alone does not give.
Color Coating
You can customize the color of the coating to fit any event theme by melting white chocolate and adding oil-based food coloring (water-based coloring makes chocolate hard). You can make gold for Diwali, red for Valentine's Day, blue for a sports team celebration, or any other color by adding different colorants to the same white chocolate base. Putting on two coats of paint in different colors, with the first coat fully dry before the second coat is added in a partial dip, makes a two-color effect that looks more complicated than the one-step process that makes it.
How To Store Oreo Pops For Freshness
Fridge Storage
If you want to keep your finished Oreo pops fresh, put them in an airtight container in the fridge with parchment paper between each layer to keep the chocolate coating from chipping or sticking to other pops. You can keep it at room temperature for up to two days in a cool, dry place away from direct sunlight. However, in any climate where the temperature is higher than 25°C, it is always better to keep it in the fridge.
Shelf Life
They stay fresh in the fridge for up to five days after being made, with no major changes in texture, flavor, or coating quality. Don't store near foods with strong smells, like cut onions or aged cheese. The chocolate coating is porous enough to soak up smells from the outside over the course of several hours.
Avoid Moisture Issues
Humidity is the biggest enemy of a chocolate-covered dessert that is kept at room temperature. Moisture in the air makes the coating turn white and chalky, which is called fat bloom. This doesn't change the taste, but it does make the dessert look less appealing. To keep their look and feel, pops that are meant to be given as gifts or shown off should always be kept in the fridge until they are ready to be given.
Can You Make Oreo Pops Without Cream?
Yes, and there are a few other things that work well in place of cream cheese, depending on what you have on hand. When you use two tablespoons of softened unsalted butter for every 20 biscuits, the dough is firmer than with cream cheese, it keeps its shape better after being refrigerated, and the milk fat gives it a slightly richer flavor. When you add sweetened condensed milk in very small amounts—one tablespoon at a time—and mix it carefully between additions. It holds the crumbs together without adding more fat. However, the dough is stickier and needs to chill for a longer time before you can shape it.
Regular whole milk can be used as a binding agent, but you have to be careful about how much you use. If you add too much liquid, the dough will quickly become unworkable. Start with one teaspoon and add more as needed. Condensed milk is the best option for people who don't have cream cheese because its sugar content helps the dough stay together even when it gets a little wetter, which would cause a butter-bound dough to soften. When making Oreo cake pops in a warm kitchen, butter-bound dough stays colder than condensed milk dough, so it's the better choice when you don't have much time to chill it.
Common Mistakes to Avoid When Making Oreo Pops
Over-Soft Dough
If you add the full amount of binding agent at once without checking the consistency between additions, the dough will be too soft to roll cleanly, leaving fingerprints on the surface and collapsing a little on the tray before the stick is put in. The solution is simple: put the dough that is too soft in the fridge for 20 minutes to harden, then see if it is still workable before adding more binding agent. Adding the cream cheese or butter one tablespoon at a time to future batches will stop this from happening.
Chocolate Too Thick/Thin
The chocolate is too thick. If you skip the step of thinning the coconut oil or let the chocolate cool too much before dipping, the coating will be uneven and lumpy instead of a clean, thin shell. When the thick coatings pool at the bottom of the pop, they make a flat edge that looks like it hasn't been finished. To keep the chocolate at the right thickness for a large batch, you don't have to heat it up again. Just keep it over a bowl of warm water between dips.
Pops Falling Off Sticks
When you put the lollipop stick into the dough ball before chilling it, it doesn't have any structural support, so it loosens when you dip it in the warm chocolate and move it around. Always put the stick in after shaping and before putting it in the fridge. This way, the dough will be completely firm around the stick after 30 minutes in the fridge, before any dipping starts. A small dot of melted chocolate on the stick before it goes in adds extra stickiness once it cools down.
Oreo Pops as Party Treats & Edible Gifts
When you package Oreo cake pops with a little thought and effort, they look great as party favors and return gifts:
-
Put each pop in a small, clear cellophane treat bag and tie the open end with a satin ribbon in the party's main color. This takes less than 30 seconds per pop and makes all of them look the same without needing any special packaging skills.
-
Put the finished pops in a block of floral foam that is wrapped in decorative paper or fabric and put in a shallow box. This makes a self-contained display centerpiece that also serves as a take-home gift station, so guests can choose their own pop without having to touch the whole display.
-
Put a small tag on each stick with the flavor, the name of the person getting it, or a short personal message. This turns a simple treat into a personalized gift that is perfect for birthdays, school farewell parties, or other fun occasions.
FAQs About Oreo Pops
How long do Oreo pops last? 
Oreo pops stay fresh for up to five days in the fridge in an airtight container. The flavor and coating quality don't change much. Two days is the safest amount of time to store them at room temperature in a cool, dry place before the texture and coating start to break down.
Can I make Oreo pops without a food processor?
Yes, a sealed zip-lock bag and a rolling pin can make a fine crumb for the dough in about two minutes of steady pressure. The most important quality check is to make sure there are no big biscuit pieces left before adding the binding agent. You can use a fine-mesh sieve to get rid of any big pieces that are still there after the first crushing.
Why are my Oreo pops cracking?
Cracking happens when the dough is too cold before dipping or when there isn't enough binding agent compared to the number of biscuits. Letting shaped balls sit at room temperature for five minutes before coating them makes them much less brittle. In most cases, adding a little more cream cheese to the dough before shaping it fixes the problem.
Can I use different flavors of Oreos?
Yes, you can use any flavor of Oreo in the cake pop recipe. The binding ratio and process stay the same no matter what flavor you use. Golden Oreos make a dough that tastes like vanilla, and mint-flavored Oreos add a refreshing taste to the finished pop. Chocolate-filled Oreos make the cocoa flavor of the base stronger than original Oreos do.
Do Oreo pops need to be refrigerated?
It is highly recommended to keep things in the fridge, especially in hot places or during the summer. The dough base has cream cheese or butter in it. Both of these things soften and become unsafe at room temperature after two hours. Keep Oreo cake pops in the fridge until 15 minutes before serving them at outdoor events. If you don't eat them all, put them back in the fridge right away.
Like This Recipe?

Thank you for rating the recipe!
Recipe by Categories
Popular Articles

7 Contemporary Chocolate Mousse Cake Designs For ...

Dreamy Engagement Cake Design Ideas For A Picture ...
4 mins
Apr 9, 2026

Gheeyar A Traditional Sindhi Sweet With A Crisp ...
3 mins
Apr 11, 2026

Gajak Sweet Origin Tracing The History Of This ...
3 mins
Apr 10, 2026

How To Make Edible Cookie Dough With Simple ...
3 mins
Apr 13, 2026
Recommended Recipes


